At this point, we should have a domain name and a server and the domain name should direct to the IP address of the server with DNS records. As I said in previous articles, the instructions I will give will be for Debian. In this article, other distributions might work a little differently.
Logging in to the server
We first want to log into our VPS to get a command prompt where we can set up the web server. I am assuming you are using either MacOS or GNU/Linux and you know how to open a terminal. On Windows, you can also use either PuTTY or the Windows Subsystem for Linux.
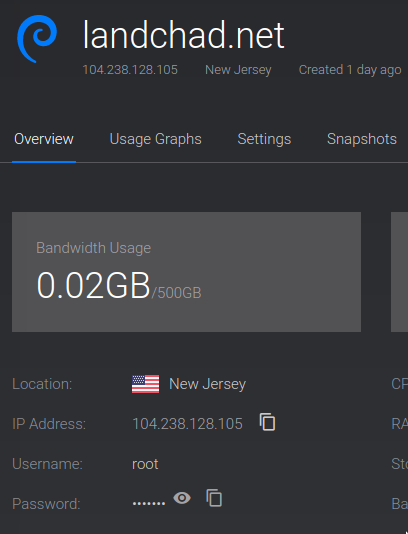
Now on Vultr's site, you can click on your VPS and you will see that there is an area that shows you the password for your server at the bottom here.
Now pull up a terminal and type:
ssh root@example.org
This command will attempt to log into your server. It should prompt you for your password, and you can just copy or type in the password from Vultr's site.
If you get an error here, you might not have done your DNS
settings right. Double check those. Note you can also replace
the example.org with your IP address, but you'll want to fix your DNS
settings soon.
Installing the Webserver: Nginx
If the program runs without an error, ssh has now logged you into your
server. Let's start by running the following commands.
apt update
apt upgrade
apt install nginx
The first command checks for packages that can be updated and the second command installs any updates.
The third command installs nginx (pronounced Engine-X), which is the
web server we'll be using, along with some other programs.
Our nginx configuration file
nginx is your webserver. You can make a little website or page, put it
on your VPS and then tell nginx where it is and how to host it on the
internet. It's simple. Let's do it.
nginx configuration files are in /etc/nginx/. The two main
subdirectories in there (on Debian and similar OSes) are
/etc/nginx/sites-available and /etc/nginx/sites-enabled. The names
are descriptive. The idea is that you can make a site configuration file
in sites-available and when it's all ready, you make a link/shortcut
to it in sites-enabled which will activate it.
First, let's create the settings for our website. You can copy and paste (with required changes) but I will also explain what the lines do.
Create a file in /etc/nginx/sites-available by doing this:
nano /etc/nginx/sites-available/mywebsite
Note that "nano" is a command line text editor. You will now be able
to create and edit this file. By saving, this file will now appear. Note
also I name the file mywebsite, but you can name it whatever you'd
like.
I'm going to add the following content to the file. The content like this will be different depending on what you want to call your site.
server {
        listen 80 ;
        listen [::]:80 ;
        server_name example.org ;
        root /var/www/mysite ;
        index index.html index.htm index.nginx-debian.html ;
        location / {
                try_files $uri $uri/ =404 ;
        }
}
Explanation of those settings
The listen lines tell nginx to listen for connections on both IPv4
and IPv6.
The server_name is the website that we are looking for. By putting
landchad.net here, that means whenever someone connects to this server
and is looking for that address, they will be directed to the content in
this block.
root specifies the directory we're going to put our website files in.
This can theoretically be wherever, but it is conventional to have them
in /var/www/. Name the directory in that whatever you want.
index determine what the "default" file is; normally when you go to
a website, say landchad.net, you are actually going to a file at
landchad.net/index.html. That's all that is. Note that that this in
concert with the line above mean that /var/www/landchad/index.html, a
file on our computer that we'll create, will be the main page of our
website.
Lastly, the location block is really just telling the server how to
look up files, otherwise throw a 404 error. Location settings are very
powerful, but this is all we need them for now.
Create the directory and index for the site
We'll actually start making a "real" website later, but let's go ahead and create a little page that will appear when someone looks up the domain.
mkdir /var/www/mysite
Now let's create an index file inside of that directory, which will appear when the website is accessed:
nano /var/www/mysite/index.html
I'll add the following basic content, but you can add whatever you want. This will appear on your website.
<!DOCTYPE html>
<h1>My website!</h1>
<p>This is my website. Thanks for stopping by!</p>
<p>Now my website is live!</p>
Enable the site
Once you save that file, we can enable it making a link to it in the
sites-enabled directory:
ln -s /etc/nginx/sites-available/mywebsite /etc/nginx/sites-enabled
Now we can just reload or restart to make nginx service the new
configuration:
systemctl reload nginx
The Firewall
Vultr and some other VPSes automatically install and enable ufw, a
firewall program. This will block basically everything by default, so we
have to change that. If you don't have ufw installed, you can skip
this section.
We must open up at least ports 80 and 443 as below:
ufw allow 80
ufw allow 443
Port 80 is the canonical webserver port, while 443 is the port used for encrypted connections. We will certainly need that for the next page.
Nginx security hint
By default, Nginx and most other webservers automatically show their
version number on error pages. It's a good idea to disable this from
happening because if an exploit comes out for your server software,
someone could exploit it. Open the main Nginx config file
/etc/nginx/nginx.conf and find the line # server_tokens off;.
Uncomment it, and reload Nginx.
Remember to keep your server software up to date to get the latest security fixes!
We now have a running website!
At this point you can now type in your website in your browser and this webpage will appear!
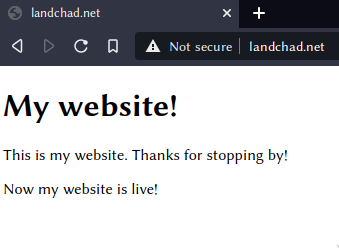
Note the "Not secure" notification. The next brief step is securing encrypted connections to your website.