Email is a lot like real-life mail. You can send email to anyone, but
you can also write whatever return address you'd like. That is, it's
pretty easy to pretend to be someone else via mail, and that was
originally the case with email as well: email is just text, and you
could just change your From: address to any email address you wanted!
DKIM (Domain Keys Identified Mail) helps solve this issue.
OpenDKIM will generate a public/private cryptographic key pair for your server. The public key will be made available publicly in your server's DNS records and the private key will be used to sign every single email that leaves the server. This means that people receiving mail from your server can now be absolutely sure that it originated from your server because their servers can check the cryptographic signature on the email with the public key!
OpenDKIM ensures that email originated from the server it claims it did, but it does not ensure that it originated from the user account it claims it did. This easier problem is solved by server-side authorization settings.
Installation
apt install opendkim opendkim-tools
The Keys and Files
We have to generate the DKIM keys and create some secondary files that will be required for our configuration.
Generate the DKIM key
Here we create directories for the OpenDKIM keys, generate them, and ensure they have the right file permissions.
mkdir -p /etc/postfix/dkim
opendkim-genkey -D /etc/postfix/dkim/ -d example.org -s mail
chgrp opendkim /etc/postfix/dkim/*
chmod g+r /etc/postfix/dkim/*
Create the key table
Now we'll tell OpenDKIM where the newly generated keys are on the file system.
echo "mail._domainkey.example.org example.org:mail:/etc/postfix/dkim/mail.private" > /etc/postfix/dkim/keytable
Create the signing table
echo "*@example.org mail._domainkey.example.org" > /etc/postfix/dkim/signingtable
Adding trusted hosts
echo "127.0.0.1
10.1.0.0/16
1.2.3.4/24" > /etc/postfix/dkim/trustedhosts
Configuring opendkim.conf
Now we have all the raw material, so open up /etc/opendkim.conf and we
can finalize our server settings. First, add these lines that will
source the files we just created.
KeyTable file:/etc/postfix/dkim/keytable
SigningTable refile:/etc/postfix/dkim/signingtable
InternalHosts refile:/etc/postfix/dkim/trustedhosts

Canonicalization        relaxed/simple
Socket                  inet:12301@localhost
There will already be an uncommented Socket directive, so delete,
comment out or replace it with the above.
Interfacing with Postfix
There are a couple things we must add to the Postfix SMTP server
settings to interface it with OpenDKIM. Specifically, we have to set our
OpenDKIM server, which will be running on port 12301, as a milter
(mail filter). This is easy to do with the four commands below:
postconf -e "myhostname = $(cat /etc/mailname)"
postconf -e "milter_default_action = accept"
postconf -e "milter_protocol = 6"
postconf -e "smtpd_milters = inet:localhost:12301"
postconf -e "non_smtpd_milters = inet:localhost:12301"
Restart and reload Postfix and DKIM
Now that we have all our settings in place:
systemctl restart opendkim
systemctl enable opendkim
systemctl reload postfix
Adding the DNS record!
We are only one step away from having functioning OpenDKIM. We must add the DKIM public key to our server's DNS settings, so go ahead and open up your registrar's site or wherever your site's DNS settings are.
The public key is found in the file /etc/postfix/dkim/mail.txt, but it
will display as multiple lines and multiple quoted strings, which is
annoying and hard to copy-and-paste into your registrar. To make things
easier, run the following command to format the key in the way we need
it for the DNS TXT entry:
echo -e "

v=DKIM1; k=rsa; $(tr -d "
" </etc/postfix/dkim/mail.txt | sed "s/k=rsa.* \"p=/k=rsa; p=/;s/\"\s*\"//;s/\"\s*).*//" | grep -o "p=.*")

"
Take the very long output of that command, which will start with
v=DKIM1 and add it as a TXT entry in your DNS settings as below. The
host we put it for is mail._domainkey.
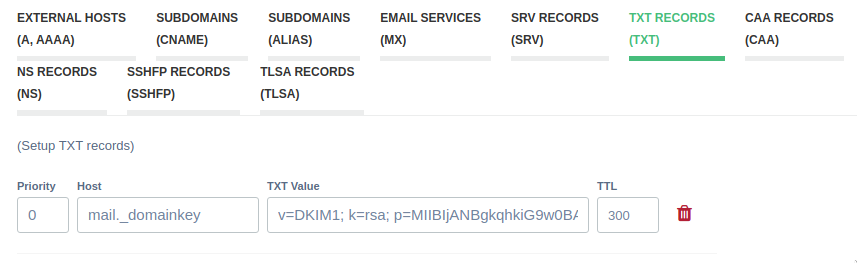
On my registrar, this is how it is input, but on some registrars, it may be
required to include your domain name as well as mail._domainkey.example.org.
If you have your own DNS server, add a TXT entry as follows:
mail._domainkey.example.org TXT v=DKIM1; k=rsa; p=ThatLongRandomSequenceOfLettersAndNumbersOfYours
Testing it out!
Now we want to send an email to make sure that your emails will now be signed with OpenDKIM.
Hostname
If you've followed these instructions, all emails from the domain
example.org will now have a DKIM signature on them. If we send mail
via the mail command, however, their domain of origin will be whatever
your server's hostname is, which you may have set to something
different than your domain.
You can permanently change your hostname by changing it in
/etc/hostname and rebooting, or you can just run
hostname example.org to change it temporarily for testing. Either way,
this will allow us to run the mail command as in the SMTP
article.
echo "Hi there.

This is the text." | mail -s "Email from the server" your@emailaddress.com
More helpful troubleshooting.
You can also go to this site, which will help you troubleshoot any other DKIM problems if you mistyped something.
DMARC
DMARC (Domain-based Message Authentication Protocol) is a protocol designed to give email domain owners the ability to protect their domain from unauthorized use.
Add the dmarc user:
useradd -m -G mail dmarc
Open up your registrar or DNS settings again, and make a new TXT record like we did with DKIM, except now use the output from the following command:
echo "_dmarc.$(cat /etc/mailname)"
echo "v=DMARC1; p=reject; rua=mailto:dmarc@$(cat /etc/mailname); fo=1"
The first line is the Host field. The latter is the TXT value.
Sender Policy Framework
Saving the easiest for last, we should add a TXT record for SPF, an email-authentication standard used to prevent spammers from sending messages that appear to come from a spoofed domain.
cat /etc/mailname
IP4=<your VPS's IPv4 address>
IP6=<your VPS's IPv6 address>
echo "v=spf1 mx a:mail.$(cat /etc/mailname) ip4:$IP4 ip6:$IP6 -all"
Note: previous versions of this guide didn’t ask you to specify the ip4
and ip6 mechanisms. If you don’t include them, some email hosts (most
notoriously gmail) will not accept mail from your server.
The IP4 and IP6 values should be the same as what you set your PTR
records to.
The output of cat /etc/mailname is the Host field. The output of the second command is the TXT value.
Again, you can check that site to make sure your DKIM, DMARC, and SPF entries are valid. That’s it!